The Evolution Of The Cost-Effective TrainCam
Recently, I incorporated a wireless camera into an HO scale 74' passenger car to make a TrainCam, and this is the story of its construction.
Lacking space to build a set in my rented single room, I built a simple 18" radius track on the carpet, going through the frame of my bed. On it, I added a short Amtrak train and watched it go in decidedly boring little circles. Not long after I started running the train, it derailed and clearly demonstrated why carpets are not the best place for model trains to be.
Meanwhile, upstairs in his room, one of my housemates had just bought a small wireless camera, battery pack, and receiver for a little over C$100 and was demonstrating its ability to broadcast conversations and images from as far as 200 feet away back to his computer screen, with the help of a TV capture card. It wasn't long before I started coveting the little camera and I soon bought myself one. It was not for the purpose of listening to my friends' conversations so much as it was to record the train as it chugged around the uneven little track on my floor."
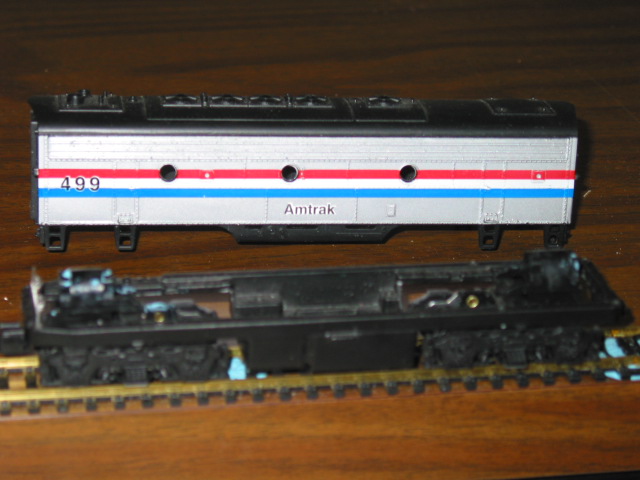
It took me a few seconds to set up the little camera and immediately, my comically slow little trains which, when travelling at maximum speed, could easily be passed by a heavily-burdened pedestrian, began to look almost life-like. On my television screen I saw Amtrak engine 231 chugging toward me as I have so often at St-Albans station in northern Vermont. Following it were two streamlined phase III passenger cars and each, in turn, went around the corner as if on a real track.
Around the same time, I was able to move my track onto a 3'x5' desk, using blue-tack adhesive as a temporary track-bed.
The camera idea was working well. I felt like I was standing beside the tracks and the noise of the miniature train cars rumbling along the desk through the camera's microphone sounded nearly realistic, but there was something missing.
When I was in grade 3, the last train came to my home-town, a simple 20 car freight train hauling a giant transformer. I went to watch with my father as it waited for clearance to leave the station. Beyond the station, the tracks had already been lifted and sold to be reprocessed as razor blades. Standing on the platform looking intently at the train paid off, though, when every youngster's dream came true and the engineer invited me up into the engine while he waited, showing me all the controls and explaining how he needed someone to come up by car to tell him he could leave because we were out of radio range. Looking out the front of the train, I could see the tracks ahead and the elaborate set-up of switches, bells, signal lights, and level crossing signals.
I wanted to recreate that feeling with my simple model train and inexpensive wireless camera. It became my obsession to build a self-contained traincam that could record the tracks as it came and went, possibly even towed by one engine, recording another, giving a movie feeling. But I wanted to do something unique - I wanted to do it so I could publish basic steps for building one, and I wanted to make the whole thing as inexpensive as possible.
My first step was to figure out what rail-car to convert into my traincam. I decided that a dummy engine base with its large truck protruding would be ideal. The truck would allow the camera to better follow the angle of the track rather than the angle of the car. But the camera was too big. The eye itself is slightly wider than the car, and it had a base, battery box, and transmitter to contend with as well. Using a hacksaw and a variety of other tools not usually associated with delicate electronics, I disassembled the camera and extracted its motherboard, transmitter, and eye without damaging any of the wires or circuits. Using my favourite adhesive - blue-tack - (second, perhaps, to duct tape), I attached the camera eye to the front truck of the dummy engine, put the motherboard in the middle, supported it with two hair-elastics, and attached the transmitter to the rear truck. The camera's power source was a battery pack nearly three times the width of the track which had 4 AA batteries and a small circuit board. The power was sent to the camera via wires separated with a plug, and the wires added up to more than 6 feet in length.
The dummy engine provided a wheel truck which protruded through the floor, allowing a camera to follow the track's, rather than the railcar's, angle.
Unperturbed, I took an old caboose, took part of the top off, and stuffed it full of wires. Next, I used a flatbed which had been part of my older brother's set at my grandparents' place when we were young and, again using blue-tack, attached the oversized battery pack to its surface.
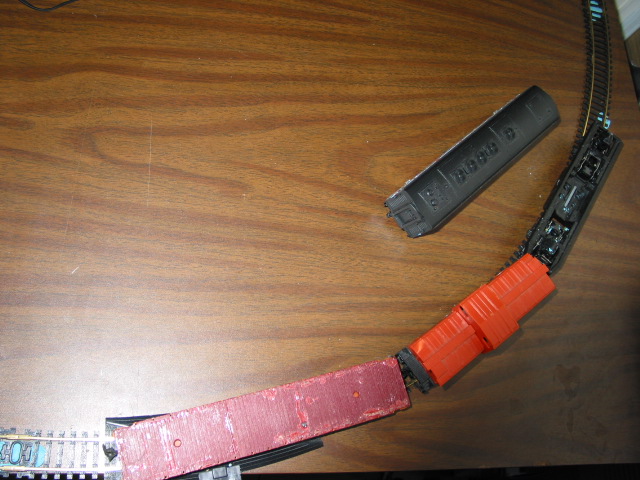
This is the base used for the original camera. Unfortunately no pictures were taken of it at the time it was used.
But all this led to a problem. If you've ever driven a car with a trailer, you know that reversing with a trailer is far more difficult than reversing without a trailer. If you add a second trailer, the vehicle becomes four times as hard to steer in reverse, and if you add a third trailer, the car becomes 16 times harder to reverse. On a train track, the problem is reduced by the metal guides which the cars are forced to follow, but any abrupt movement by an engine pushing three unbalanced cars attached together by stiff wires is very likely to cause a derailment. So the camera could only be pulled, and I found myself spending a good deal of time watching where I had been rather than where I was going, defeating the purpose of the entire exercise - namely to feel like I was watching out the front of a train.
To solve the problem I would need to do what I had originally set out to do - build the entire camera system into no more than one rail-car, and there had to be one more condition: the car could not exceed the length of an 85 foot car, in order to ensure that it could be run on nearly any HO gauge set-up. It also could not exceed the height of an auto-carrier excess-height car (anything less would not have been possible with the size of the transmitter) so it could run on any track with reasonable tunnel and bridge heights. The answer was a 74' Northern Pacific observation passenger car, made by Athearn, because that company's cars' covers detach from the base, giving me more room to work.
In the end, the traincam turned out to be slightly taller than an autocarrier, but was short enough and had a low enough centre of gravity to negotiate most corners.
There was still one more problem, though. The battery pack was too big to fit in anything short of a garden train, and it had a circuit board inside it, whose purpose I had not yet determined. My first thought was to put four AA batteries inside the car and attach them to a plug of the same type as that on the camera, but the circuit board stopped me.
Using a voltagemeter, it became apparent that the circuit board was a voltage multiplier, which increased the batteries' 6 volts to 24 volts. This gave me five options:
- build my own circuit board with the same function
- use a second car and fill it with 16 AA batteries
- use 2 12V remote-control batteries
- disassemble the battery pack and use its circuit board
- run the camera off the track's power
Option 1 - building my own circuit board - was out of the question. I had neither the necessary experience nor the know-how to build my own voltage multiplier.
Option 2 - using a second car to hold loads of batteries - had some appeal to it; a model rail-car weighing that much would not derail if it was rammed by a real one, but the cost of 16 batteries and the extra space needed seemed prohibitive. Besides, I explicitly wanted to limit this project to a single car.
Option 3 - using two small 12-volt remote-control batteries - was a good idea. The logic seemed OK to me. I knew that two 12V batteries would cost me about $14 to replace and that they would have a shorter life-span than multiple AA batteries, but they were tiny and left lots of extra room in the car for the motherboard, wiring, camera, and transmitter. Option 4 - disassembling the existing battery pack for its circuit board - was also a good idea, but I was concerned that I might damage the board while extracting it. Option 5 - running the camera off of track power - sounded like the best idea. With nickel metal hydride or lithium ion rechargeable batteries (the type used in laptops), I thought that I could possibly keep enough charge to run the camera when the tracks were off, and have it constantly recharge when the tracks were on. But the problem lay in the fact that the camera ran at 24V and the track ran at between (-15V) and 15V, a circuitry nightmare for someone without the knowledge to build a simple multiplier.
I settled on option 3, which involved purchasing two small 12-volt batteries, and, believing I had solved all my design problems, took the cover off my observation car and began adding the camera, its motherboard, and transmitter. The camera fit nicely at one end of the car, but the motherboard and transmitter were too tall and could not be left like that. Realising that the car would probably be heavy enough with the camera, I took the ballast weights out of the bottom of the car, and the motherboard fit very well into to centre, where the base is lower than elsewhere. The transmitter also fit, though it exceeded the height of an auto-carrier excess-height car by a fraction of an inch. Everything up until this point was being held down with blue-tack.
Putting the motherboard in the centre allowed a tiny selector switch on it to be accessible from the side holding the camera. The switch allowed for choosing which channel the camera would use within the 2.4GHz band, and in turn would allow 4 different cameras of this type to operate in the same area at the same time.
In order to use the top of the car, I had to cut most of an inch off the front of the cover to allow room for the camera, and cut off the observation window and a strip of plastic most of the way to the opposite end of the car from the camera, where the motherboard and transmitter would be allowed to protrude, as well as a large un-train-like power switch. For power, I used a single AA battery holder cut in half and glued to the base with the two halves separated to be a little bit longer than it was originally intended. Then I added the two 12V batteries, put the cover on the car, and turned on the switch.
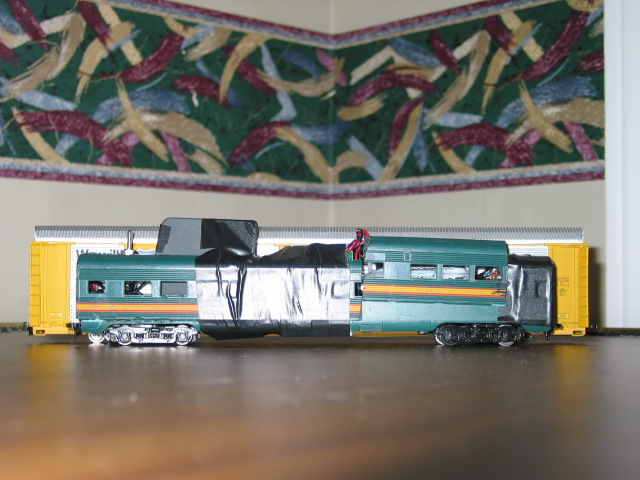
The original version of the self-contained traincam had a large camera head at the front and required a major section of the railcar's body to be removed from the front and top.
On my television screen was a nice view of the tracks looking forward from my traincam. I attached an engine to the back of it and turned the engine on, pushing the camera. It worked perfectly. My very own traincam was going happily around my miniature, undecorated set-up. I was excited.
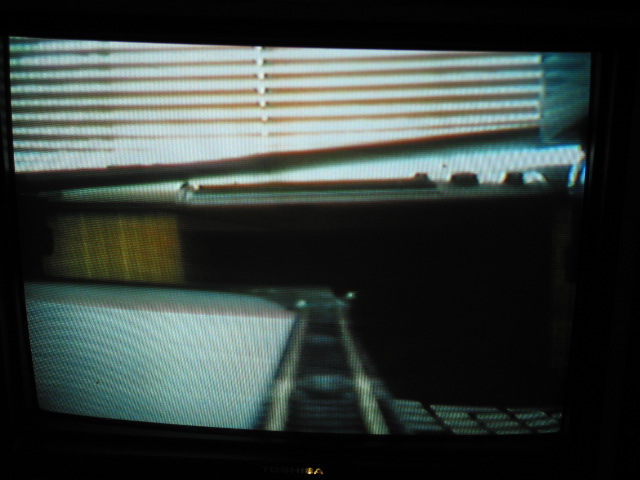
The image on the screen was exactly what I had hoped for.
I mentioned earlier that 12V batteries would probably have a shorter life span than multiple AA batteries, and as it happens, I was right. As the camera approached the end of its first lap, the television screen went fuzzy and then turned to blue. The batteries had lasted a total journey of nearly 14 feet in 15 seconds. My heart sank. My traincam would not make it around the first bend of any respectable set-up before running out of juice, so it was back to my list of options.
The logical thing to do with the failure of the 12V batteries was to go with option 4: disassemble my existing battery pack and remove its circuit board. That sounded nice in theory, but the inside of the traincam had very little room left, certainly not enough room to hold four AA batteries let alone a small circuit board and additional wires associated with another board.
In spite of myself, I disassembled the battery pack, carefully removing the circuit board with a large pair of pliers in a manner reminiscent of the way junk-yards recover engines from discarded vehicles. Having extracted the board, I cut the wire leaving the battery pack at the plug and I finally had my power solution -- with one problem. I still had to fit 4 AA batteries in the confined space of a one-inch wide train car with the added challenge of making them easy to replace without having to disassemble anything. In the true spirit of ruthless destructiveness, I carefully cut away a huge section of the frame and was able to fit four batteries between the camera and the motherboard, using the cut-away piece of frame as a battery cover. I then cut the wires to the glued-down base of the 12V battery holder and rewired the train to have an extra circuit board in its place, capable of multiplying 6V to 24V.
Having tested all the wires before reassembling the case, I was confident that the camera would work flawlessly and, using model cement, I glued the cover onto the base, covering all the circuitry and leaving only the batteries exposed. Using blue-tack, I attached the removed section of cover over the batteries and was amused by the yellow stripe on the side of the car being no longer quite so straight.
On to the next step: the test.
I turned the camera on, expecting to see the track show up on my television screen.
Instead, a visible spark, and a blue screen lacking only the familiar message "Fatal error" greeted me.
Removing the cover with the glue half-dried was an experience in itself, and when I finally did manage to get the traincam open, I found that the circuit board from the battery pack's negative wire, which I hadn't insulated, had made contact with the camera's motherboard, resulting in a short circuit and an unwelcome interruption in service. With a little electrical tape for the short circuit and all other exposed wires, it was time to add more glue and test the camera once again.
I attached the camera to a U.S. Army engine and turned the transformer on. The camera car very smoothly allowed itself to be pushed rapidly around the track. Holding my breath, I turned the camera on and let it go around the track once again. On my television screen I saw the tracks zip by, and the batteries even lasted for a while.
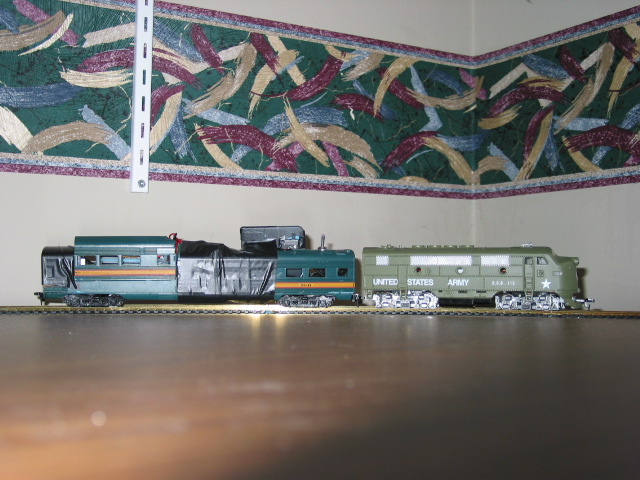
The US Army engine and traincam are viewed here in profile on my desk.
The next morning I turned the camera on, and it had no life. Some quick tests with the voltagemeter revealed that something had drained my batteries during the night. I'd have to disassemble it and figure out what was draining the batteries in my sleep.
I decided I would use the opportunity to add lighting to the camera. In the dark, such as in a tunnel or simply in an unlit room, there was no image.
With the help of a lighting kit, which consists of 2 small lightbulbs and some wires, I affixed a light bulb on either side of the camera lens.
This created a new problem, however, as the camera was too big for the lights. I would have to disassemble the camera head, too, and that meant cutting, stripping, and reattaching some extremely fine wires. Meanwhile my battery draining problem was forgotten.
I removed the screws holding the wheel truck in place under the camera and fed the wires for one of the lights down through the tiny hole. One of my lights, I decided, would be track powered. The other light would be attached to the battery pack and come on when the camera came on.
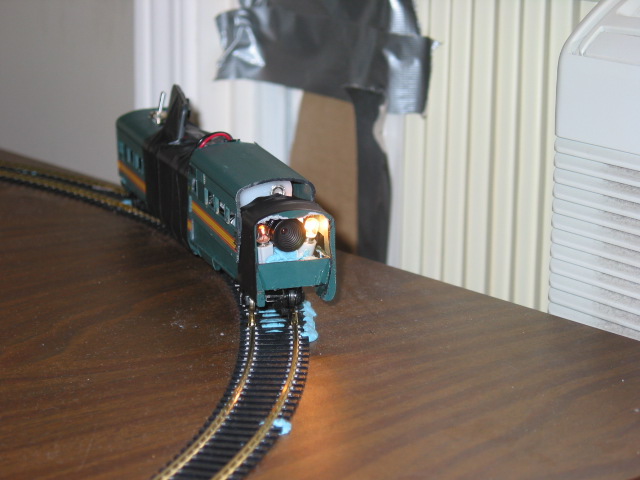
The two lights are clearly visible in the front of the traincam. On-board batteries power the one to the left, and the one seen to the right is powered by the tracks. The one powered by the batteries is dimmer than the one powered by the tracks as it is being connected to the camera's electrical system before the multiplier, resulting in a lower voltage -- and better power conservation to power the all-important camera.
With the now reduced camera with its exposed circuitry sitting in a bed of blue-tack near the front of the traincam, I was finally able to fit the lights in place, using still more blue-tack, on either side of the camera, behind the front ledge of the lens so that they would not overpower an image the camera tried to capture. Seeing that the camera and lights were all exposed to the elements, I began to glue back the front inch or so of the shell which I'd cut off to make room for the original design. This provided a shelter for the camera and lights in the event of a derailment (which could be catastrophic on my desk, as trains derailing have the annoying habit of plunging 2 feet to horrible destruction on the floor) and a way of focusing the light from the two lightbulbs forward, illuminating the view for the camera in the event that ambient light would not be strong enough. The track-powered light worked flawlessly. It was about time something on this camera did. In a dark room, the track-powered light at full power was strong enough to read by from more than a foot away.
The other light, the one attached to the internal circuitry of the camera, still posed a problem. The only wires that were not insulated, and so didn't involve a complete disassembly, were the connectors where the batteries made contact with the voltage multiplier. But that left a problem: as long as the batteries were plugged in, the light would be on. It would make my existing power-drainage problem a walk in the park by comparison.
My power-drainage problem? I had forgotten about that! Forgetting about the problem of the light draining the battery pack, I set back about my original task of fixing the power drainage. It wasn't long before I put 2 and 3 together and was pretty sure I'd come up with 5. My battery pack went straight to the multiplier, the multiplier then sent power to the switch and from there to the camera's motherboard. That meant there was only one place that could be drawing power: the multiplier.
I carefully removed the multiplier and all the wires from the guts of the traincam, and with wires hanging everywhere and blue-tack getting stuck to everything, I thoroughly examined the multiplier. What, I thought, could I do about this problem, without completely rebuilding the system?
It was simple. There was a tiny wire on the multiplier I'd previously ignored, and attached to it was a small switch. Obviously, that switch was not just an on-off switch for the camera: when on, the multiplier was draining power even if there was no draw on it.
With this piece of information I was able to kill two birds with one stone. I attached one of the battery-powered light's wires to the switch, and moved the switch to somewhere where I could reach it outside of the jumble of wires inside the traincam's shell. Using electrical tape and blue-tack, I affixed it to the transmitter antenna.
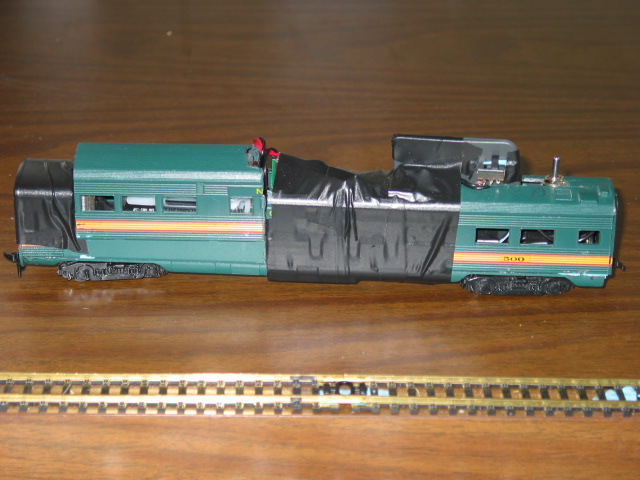
At the back of the car, two switches are visible. The large metal switch in the back was the original switch, and the smaller one attached to the transmitter is the multiplier switch.
With that solution in place, I installed fresh batteries, put all the innards back into the train's open hole, sealed it up with electrical tape, and tested it.
Now the natural assumption here is that it worked, and it wouldn't be a bad assumption. But it would be only half right.
I turned on the switch attached to the voltage multiplier, and the light on one side of the camera came on. That was a good start. I took a deep breath, and turned the camera switch on.
The audio static on my TV set disappeared, and I waited expectantly for the video static to do the same. I had sound but no sight. What good was a train camera that had sound but no sight?
I removed the battery section's cover, removed the battery pack, and unceremoniously squeezed all the fine wires I'd earlier stripped and spliced to get the camera out of its shell. Then I put the battery pack back in and the cover on.
The problem turned out to be a weight imbalance. The end of the traincam with the batteries was heavy enough to pave a road, but the other half of the car, which held only the switch, the transmitter, and some wires, was too light and could easily be imbalanced and leave the track. With the help of a pair of container weights and some more electrical tape, I was able to easily remedy this last problem by strapping the weights under the car and holding them there with the tape.
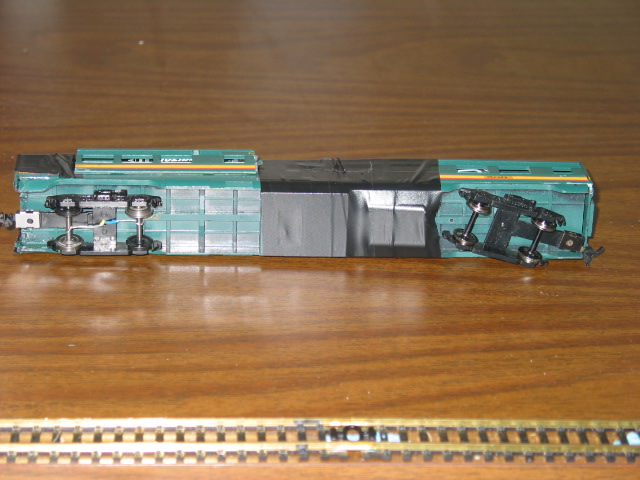
Near the back wheels, visible to the right, a bulge hides two heavy pieces of metal known as container weights. Under the camera at the back (to the left in the photo), the wheel truck can be seen to have two wires, from which power for the camera's light is collected.
At long last, I had a traincam that worked. A comparable traincam on-line would have cost a minimum of US$360, approximately $550 Canadian, and would still have required a train car to mount it in and some assembly. Purchasing a traincam built into a railcar cost even more.
This cost-effective self-contained traincam was completed for an estimated cost of C$170 (approximately US$115) and uses the following components:
(Prices are approximate and in Canadian currency)
- X-10 Wireless 2.4GHz wireless camera receiver (model VR31A) (attached to VCR)
- X-10 Wireless 2.4GHz wireless camera and components (model XC10A) (camera, motherboard, transmitter)
- X-10 Wireless camera battery pack components (model ZB10A) (voltage multiplier) (all camera components C$118)
- Athearn Northern Pacific 74' observation car (C$20)
- Small screw-on electric switch (C$2)
- 4 AA batteries (C$7)
- 2 small lights (C$5)
- Container weights (C$5)
- 2 AA battery holders with 9V battery style plugs (C$5)
- 2 9V battery style wires and plugs (C$2)
- Electrical tape (C$1)
- Model cement (C$2)
- Blue-tack (C$3)
- Wires (scavenged from 6' of wire attached to camera) (C$0)
Originally posted on Slashdot 2002-12-03. Reposted here 2019-11-21.
Posted at 19:21 on December 03, 2002
This entry has been archived. Comments can no longer be posted.